Journal
I Built My Own AI Image Generator in the Terminal
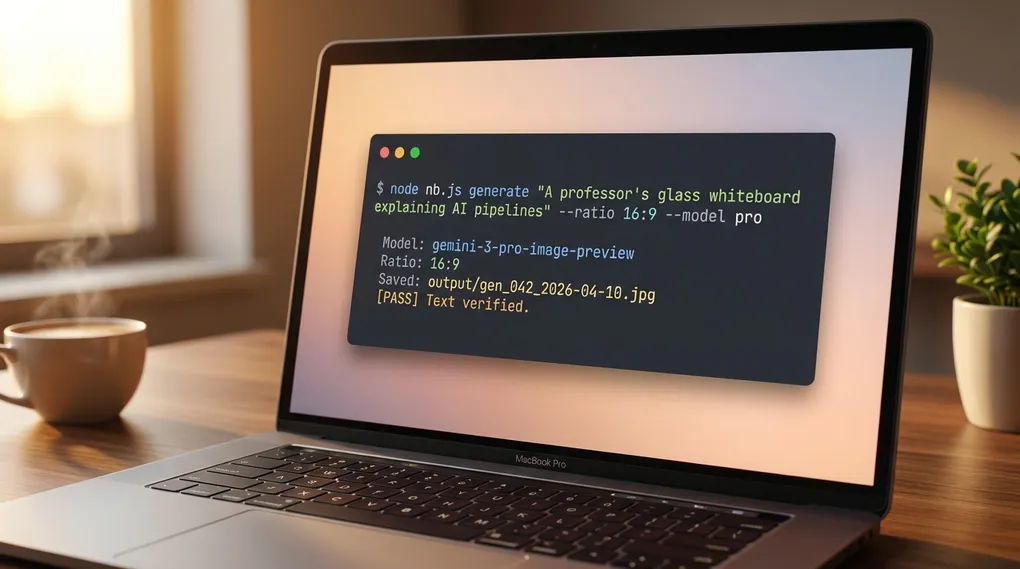
I stopped paying subscriptions for image tools. I built my own. It runs in my terminal, calls Google Gemini under the hood, applies my brand style by default, and runs a second model that proofreads every generation and auto-fixes typos before I see them. Total build time was one hour. No monthly fee. I pay the Gemini API cost per image, which runs a few cents on the flash models and more on pro.
This post is the full build. Four files, every line of code, every prompt I use, and the pipeline that kills the typo problem. If you vibecode with Claude Code and you want your own image tool, paste this post into your agent and it will build the whole thing with you. Skip to the bottom for the agent instructions.
Why I Built This Instead of Paying for Midjourney
I kept hitting the same wall. I needed one specific image for a blog post, a Twitter thread, or a client deck. I opened ChatGPT, got something generic. Opened Midjourney, fought with Discord. Opened Canva, clicked through a dozen menus. An hour later I still had nothing I could ship.
None of those tools fit how I work. I keep Claude Code open, a terminal ready, and I talk in plain English about what I need. I wanted a command I could run from anywhere. So I built one. I call it nb-studio. The name is short for Nano Banana studio, the community nickname for Google’s Gemini image models.
Here is how nb-studio compares to the tools I replaced:
| Feature | Midjourney | DALL-E 3 | Canva | nb-studio |
|---|---|---|---|---|
| Cost | $10-60/mo | $20/mo | $15/mo | Pay-per-use API |
| Scriptable from terminal | No | No | No | Yes |
| Brand style auto-applied | No | No | Partial | Yes |
| Typo auto-fix loop | No | No | No | Yes |
| Batch from bash / cron | No | No | No | Yes |
| You own the code | No | No | No | Yes |
The typo auto-fix is the feature that sold me on building my own. Image models garble text. They render “Memory” as “Memery” and skip items 5 to 7 in a numbered list. nb-studio runs a second Gemini model that reads the output, compares it to the prompt, and loops back into the edit function to fix errors. No mainstream image tool does this.
Here is the pipeline every image flows through:
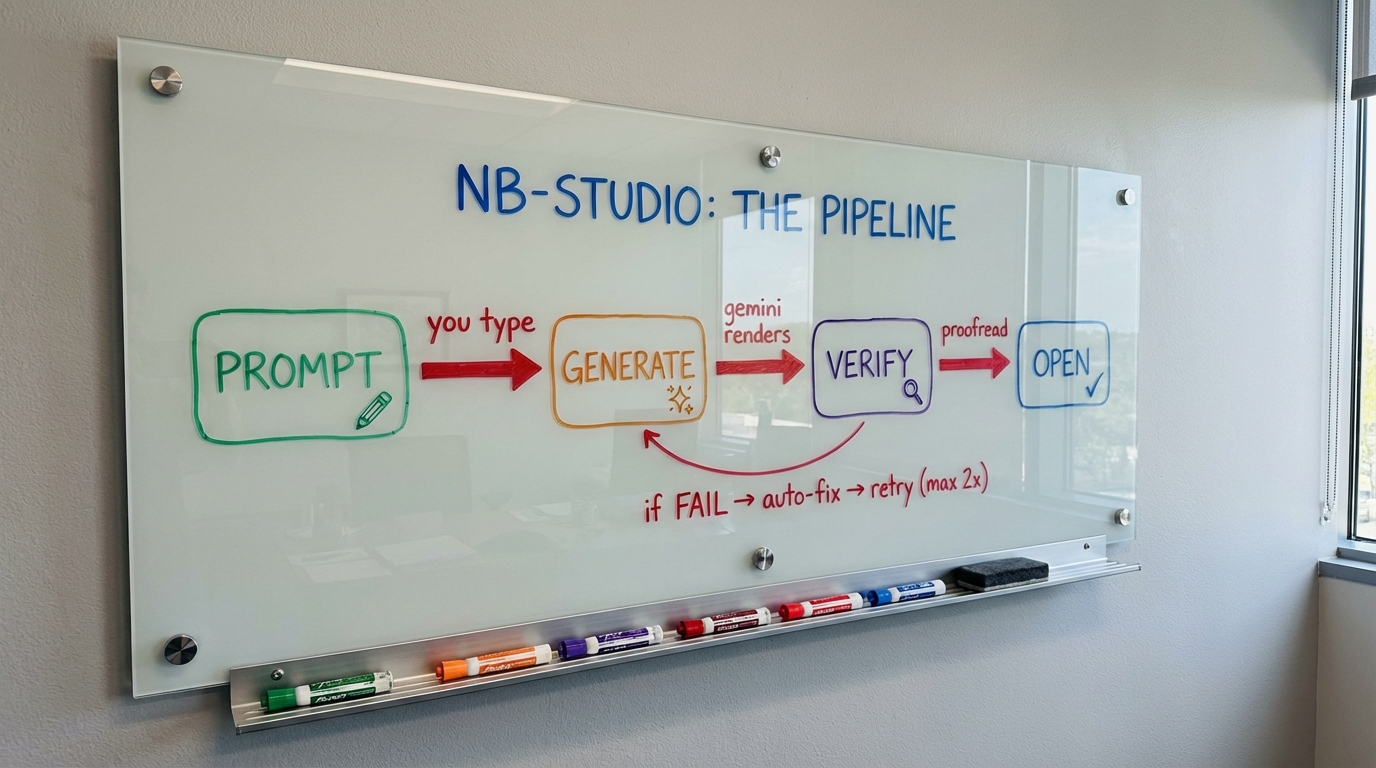
Two attempts by default. The whiteboard above was generated by nb-studio and passed the verify loop on the first try.
What You Need Before You Start
Four things, all free, under ten minutes:
- Node.js 18 or higher. The runtime that lets JavaScript run outside a browser.
- A Google account. Free Gemini API key at aistudio.google.com.
- A text editor. Cursor, VS Code, Sublime, whatever you already use.
- Your terminal. Built into your Mac or Windows machine.
No prior coding experience required. You will copy four files and run a few commands. If you can follow a recipe, you can build this.
How to Install Node.js on Mac
Open Terminal and run:
node --versionIf you see v18.0.0 or higher, skip ahead. If you see “command not found,” download the LTS version from nodejs.org, run the installer, accept defaults, and restart your terminal. Check the version again.
How to Get a Google Gemini API Key
- Go to aistudio.google.com
- Sign in with any Google account
- Click Get API Key in the left sidebar
- Click Create API Key and copy the long string
- Save it somewhere safe. You will paste it into a
.envfile next
Treat the key like a password. Never commit it to Git. I set a billing cap in Google Cloud Console to cap surprise charges. You should too.
Create the Project Folder
In your terminal:
mkdir -p ~/nb-studio
cd ~/nb-studio
mkdir -p lib output references
npm init -y
npm install dotenv
Create a file called .env in the project root with one line:
GEMINI_API_KEY=paste_your_actual_key_hereYour folder structure:
nb-studio/
├── .env              # your secret API key
├── package.json      # Node dependencies
├── lib/              # reusable code modules
├── output/           # generated images land here
└── references/       # brand style config
Four files to write. I will walk through each one.
File 1: The Gemini API Wrapper (lib/gemini.js)
This file is the translator between your prompts and Google’s AI. It knows how to generate images, edit them, and use Gemini’s vision model as a proofreader. Create lib/gemini.js:
const fs = require("fs");
const path = require("path");

const MODELS = {
  flash: "gemini-2.5-flash-image",
  flash2: "gemini-3.1-flash-image-preview",
  pro: "gemini-3-pro-image-preview",
};

const RATIOS = {
  "1:1": "square (1:1 aspect ratio)",
  "16:9": "wide landscape (16:9 aspect ratio)",
  "9:16": "tall portrait (9:16 aspect ratio)",
  "4:3": "landscape (4:3 aspect ratio)",
  "3:4": "portrait (3:4 aspect ratio)",
};

const API_BASE =
  "https://generativelanguage.googleapis.com/v1beta/models";

async function callGemini(model, parts, apiKey) {
  const url = `${API_BASE}/${model}:generateContent?key=${apiKey}`;
  const body = {
    contents: [{ parts }],
    generationConfig: {
      responseModalities: ["IMAGE", "TEXT"],
    },
  };
  const res = await fetch(url, {
    method: "POST",
    headers: { "Content-Type": "application/json" },
    body: JSON.stringify(body),
  });
  if (!res.ok) {
    const msg = await res.text();
    throw new Error(`Gemini API error ${res.status}: ${msg}`);
  }
  return res.json();
}

function extractImage(response) {
  const candidates = response.candidates || [];
  for (const c of candidates) {
    for (const p of c.content?.parts || []) {
      if (p.inlineData) {
        return {
          data: p.inlineData.data,
          mimeType: p.inlineData.mimeType || "image/png",
        };
      }
    }
  }
  for (const c of candidates) {
    for (const p of c.content?.parts || []) {
      if (p.text) return { text: p.text };
    }
  }
  return null;
}

function imageToBase64(filePath) {
  return fs.readFileSync(filePath).toString("base64");
}

function getMimeType(filePath) {
  const ext = path.extname(filePath).toLowerCase();
  const map = {
    ".png": "image/png",
    ".jpg": "image/jpeg",
    ".jpeg": "image/jpeg",
    ".webp": "image/webp",
    ".gif": "image/gif",
  };
  return map[ext] || "image/png";
}

async function generate(prompt, { model = "flash2", ratio = "1:1", apiKey }) {
  const modelId = MODELS[model] || model;
  const ratioDesc = RATIOS[ratio] || ratio;
  const fullPrompt = `Generate a ${ratioDesc} image: ${prompt}`;
  const response = await callGemini(modelId, [{ text: fullPrompt }], apiKey);
  return extractImage(response);
}

async function edit(imagePath, editPrompt, opts) {
  const { model = "flash2", apiKey, referencePath = null } = opts;
  const modelId = MODELS[model] || model;
  const parts = [
    {
      inlineData: {
        mimeType: getMimeType(imagePath),
        data: imageToBase64(imagePath),
      },
    },
  ];
  if (referencePath) {
    parts.push({
      inlineData: {
        mimeType: getMimeType(referencePath),
        data: imageToBase64(referencePath),
      },
    });
  }
  parts.push({ text: editPrompt });
  const response = await callGemini(modelId, parts, apiKey);
  return extractImage(response);
}

const VERIFY_MODEL = "gemini-2.5-flash";

async function analyzeImage(imagePath, textPrompt, apiKey) {
  const url = `${API_BASE}/${VERIFY_MODEL}:generateContent?key=${apiKey}`;
  const parts = [
    {
      inlineData: {
        mimeType: getMimeType(imagePath),
        data: imageToBase64(imagePath),
      },
    },
    { text: textPrompt },
  ];
  const body = {
    contents: [{ parts }],
    generationConfig: { responseModalities: ["TEXT"] },
  };
  const res = await fetch(url, {
    method: "POST",
    headers: { "Content-Type": "application/json" },
    body: JSON.stringify(body),
  });
  if (!res.ok) {
    const msg = await res.text();
    throw new Error(`Gemini API error ${res.status}: ${msg}`);
  }
  const response = await res.json();
  for (const c of response.candidates || []) {
    for (const p of c.content?.parts || []) {
      if (p.text) return { text: p.text };
    }
  }
  return null;
}

module.exports = { generate, edit, analyzeImage, MODELS, RATIOS };
Two Gemini models, one pipeline. The image model draws. The text model reads. Pairing them gives you text accuracy neither model alone can produce.
File 2: The Brand Style System (lib/style.js)
This tiny file prepends your brand’s visual style to every prompt. Set it once, every image looks like it belongs to the same family. Create lib/style.js:
const fs = require("fs");
const path = require("path");

const STYLE_PATH = path.join(
  __dirname,
  "..",
  "references",
  "active-style.json"
);

function loadStyle() {
  if (!fs.existsSync(STYLE_PATH)) return null;
  try {
    const data = JSON.parse(fs.readFileSync(STYLE_PATH, "utf8"));
    if (data.prompt_prefix && data.prompt_prefix.trim()) return data;
  } catch {}
  return null;
}

function applyStyle(prompt, noStyle = false) {
  if (noStyle) return prompt;
  const style = loadStyle();
  if (!style || !style.prompt_prefix) return prompt;
  return `${style.prompt_prefix} ${prompt}`;
}

module.exports = { loadStyle, applyStyle, STYLE_PATH };
Create references/active-style.json:
{
  "name": "my-brand",
  "prompt_prefix": "Clean modern style. Primary #2D8659. Inter font. White backgrounds. Flat vectors."
}
Every generation inherits this style. Pass --no-style for a one-off.
File 3: The Typo Verifier (lib/verify.js)
The module that makes nb-studio better than Midjourney or DALL-E for text-heavy images. After every generation, it sends the image back to Gemini’s vision model with the original prompt and asks: did the text render correctly? If not, it writes a fix instruction. Create lib/verify.js:
const { analyzeImage } = require("./gemini");

const VERIFY_PROMPT = `You are a strict text proofreader for AI-generated images.

Read ALL text visible in this image. Compare it against the original prompt below and check for:
1. Misspelled words (even single-letter errors)
2. Duplicated items that should only appear once
3. Wrong, skipped, or repeated numbers in lists
4. Missing text that was requested but not rendered
5. Garbled or unreadable text
6. Wrong words substituted for correct ones

ORIGINAL PROMPT:
---
{PROMPT}
---

If ALL text in the image is accurate and complete, respond with: PASS

If there are ANY text errors, respond in this format:
FAIL
ISSUES:
- <describe each issue>
FIX:
<a specific edit instruction to fix all text issues while preserving the image>`;

async function verifyImageText(imagePath, originalPrompt, apiKey) {
  const prompt = VERIFY_PROMPT.replace("{PROMPT}", originalPrompt);
  let result;
  try {
    result = await analyzeImage(imagePath, prompt, apiKey);
  } catch (err) {
    return {
      pass: true,
      skipped: true,
      raw: `Verification skipped: ${err.message}`,
    };
  }
  if (!result || !result.text) return { pass: true, skipped: true };
  const text = result.text.trim();
  if (text === "PASS" || text.startsWith("PASS")) {
    return { pass: true, raw: text };
  }
  const issuesMatch = text.match(/ISSUES:\s*\n([\s\S]*?)(?=\nFIX:)/);
  const fixMatch = text.match(/FIX:\s*\n([\s\S]*?)$/);
  return {
    pass: false,
    issues: issuesMatch ? issuesMatch[1].trim() : "Text discrepancies detected",
    fix: fixMatch ? fixMatch[1].trim() : "Fix all text errors.",
    raw: text,
  };
}

module.exports = { verifyImageText };
This is the feature that solves the infographic problem I hit with every other tool.
File 4: The CLI Entry Point (nb.js)
The file you type into your terminal. It parses your command, applies your brand style, calls Gemini, saves the image, runs the verify-and-fix loop, and opens the final image on your screen. Create nb.js in the project root:
#!/usr/bin/env node
require("dotenv").config({
  path: require("path").join(__dirname, ".env"),
});

const fs = require("fs");
const path = require("path");
const { generate, edit } = require("./lib/gemini");
const { applyStyle } = require("./lib/style");
const { verifyImageText } = require("./lib/verify");
const { execSync } = require("child_process");

const OUTPUT_DIR = path.join(__dirname, "output");
if (!fs.existsSync(OUTPUT_DIR)) {
  fs.mkdirSync(OUTPUT_DIR, { recursive: true });
}

function openImage(filePath) {
  try {
    execSync(`open "${filePath}"`, { stdio: "ignore" });
  } catch {}
}

function getApiKey() {
  const key = process.env.GEMINI_API_KEY;
  if (!key) {
    console.error("Error: GEMINI_API_KEY not set.");
    process.exit(1);
  }
  return key;
}

function timestamp() {
  return new Date()
    .toISOString()
    .replace(/[:.]/g, "-")
    .replace("Z", "");
}

function nextNumber(prefix) {
  const files = fs
    .readdirSync(OUTPUT_DIR)
    .filter((f) => f.startsWith(prefix));
  let max = 0;
  for (const f of files) {
    const m = f.match(new RegExp(`^${prefix}_(\\d+)`));
    if (m) max = Math.max(max, parseInt(m[1], 10));
  }
  return String(max + 1).padStart(3, "0");
}

function saveImage(data, mimeType, prefix) {
  const ext = mimeType.includes("jpeg") ? ".jpg" : ".png";
  const filename = `${prefix}_${nextNumber(prefix)}_${timestamp()}${ext}`;
  const filePath = path.join(OUTPUT_DIR, filename);
  fs.writeFileSync(filePath, Buffer.from(data, "base64"));
  return filePath;
}

function parseArgs(args) {
  const flags = {};
  const positional = [];
  for (let i = 0; i < args.length; i++) {
    const a = args[i];
    if (a === "--ratio" && i + 1 < args.length) flags.ratio = args[++i];
    else if (a === "--model" && i + 1 < args.length) flags.model = args[++i];
    else if (a === "--no-style") flags.noStyle = true;
    else if (a === "--no-verify") flags.noVerify = true;
    else if (a === "--max-fixes" && i + 1 < args.length) {
      flags.maxFixes = parseInt(args[++i], 10);
    } else positional.push(a);
  }
  return { flags, positional };
}

async function verifyAndFix(filePath, originalPrompt, apiKey, model, maxFixes) {
  let currentPath = filePath;
  for (let attempt = 1; attempt <= maxFixes; attempt++) {
    console.log(`  Verifying text (attempt ${attempt}/${maxFixes})...`);
    let verification;
    try {
      verification = await verifyImageText(currentPath, originalPrompt, apiKey);
    } catch (err) {
      console.log(`  Warning: ${err.message}`);
      return currentPath;
    }
    if (verification.skipped) return currentPath;
    if (verification.pass) {
      console.log(`  [PASS] Text verified.`);
      return currentPath;
    }
    console.log(`  [FAIL] Issues:\n    ${verification.issues}`);
    console.log(`  Auto-fixing...`);
    let fixResult;
    try {
      fixResult = await edit(currentPath, verification.fix, { model, apiKey });
    } catch (err) {
      console.log(`  Fix failed: ${err.message}`);
      return currentPath;
    }
    if (!fixResult || (!fixResult.data && fixResult.text)) return currentPath;
    currentPath = saveImage(fixResult.data, fixResult.mimeType, "fix");
    console.log(`  Fixed: ${currentPath}`);
  }
  return currentPath;
}

async function cmdGenerate(args) {
  const apiKey = getApiKey();
  const { flags, positional } = parseArgs(args);
  const prompt = positional.join(" ");
  if (!prompt) {
    console.error('Usage: node nb.js generate "your prompt"');
    process.exit(1);
  }
  const styledPrompt = applyStyle(prompt, flags.noStyle);
  const modelChoice = flags.model || "flash2";
  const result = await generate(styledPrompt, {
    model: modelChoice,
    ratio: flags.ratio || "1:1",
    apiKey,
  });
  if (!result || (result.text && !result.data)) {
    console.error("No image returned.");
    process.exit(1);
  }
  let filePath = saveImage(result.data, result.mimeType, "gen");
  console.log(`  Saved: ${filePath}`);
  if (!flags.noVerify) {
    const maxFixes = Number.isFinite(flags.maxFixes) ? flags.maxFixes : 2;
    filePath = await verifyAndFix(
      filePath,
      prompt,
      apiKey,
      modelChoice,
      maxFixes
    );
  }
  openImage(filePath);
}

async function cmdEdit(args) {
  const apiKey = getApiKey();
  const { flags, positional } = parseArgs(args);
  if (positional.length < 2) {
    console.error('Usage: node nb.js edit <image> "instructions"');
    process.exit(1);
  }
  let imagePath, referencePath, editPrompt;
  if (positional.length >= 3 && fs.existsSync(positional[1])) {
    imagePath = path.resolve(positional[0]);
    referencePath = path.resolve(positional[1]);
    editPrompt = positional.slice(2).join(" ");
  } else {
    imagePath = path.resolve(positional[0]);
    editPrompt = positional.slice(1).join(" ");
  }
  if (!fs.existsSync(imagePath)) {
    console.error(`Not found: ${imagePath}`);
    process.exit(1);
  }
  const modelChoice = flags.model || "flash2";
  const result = await edit(imagePath, editPrompt, {
    model: modelChoice,
    apiKey,
    referencePath,
  });
  if (!result || (result.text && !result.data)) {
    console.error("No image returned.");
    process.exit(1);
  }
  let filePath = saveImage(result.data, result.mimeType, "edit");
  console.log(`  Saved: ${filePath}`);
  if (!flags.noVerify) {
    const maxFixes = Number.isFinite(flags.maxFixes) ? flags.maxFixes : 2;
    filePath = await verifyAndFix(
      filePath,
      editPrompt,
      apiKey,
      modelChoice,
      maxFixes
    );
  }
  openImage(filePath);
}

const [, , command, ...rest] = process.argv;
switch (command) {
  case "generate":
  case "gen":
    cmdGenerate(rest).catch((e) => {
      console.error(e.message);
      process.exit(1);
    });
    break;
  case "edit":
    cmdEdit(rest).catch((e) => {
      console.error(e.message);
      process.exit(1);
    });
    break;
  default:
    console.log(`
  nb-studio: AI image generation from your terminal

  generate <prompt> [--ratio 16:9] [--model pro] [--no-style] [--no-verify]
  edit <image> [reference] <instructions>
`);
}
Save all four files. You are ready to generate.
Generate Your First Image
From your terminal inside nb-studio:
node nb.js generate "A friendly orange cat in a Paris café" \
  --ratio 16:9 --no-verify
The --no-verify flag skips the proofreader since there is no text in this image. In about 15 seconds the image saves to output/gen_001_...jpg and pops open on your screen.
If it worked, you built a local AI image generator. If it did not, jump to the troubleshooting section.
The Whiteboard Prompt Formula
The prompt pattern I use most. It is the single most valuable technique I have found for generating business infographics. Instead of asking the AI to “create an infographic” (which always looks like clipart), you ask it to photograph a real-looking physical whiteboard that happens to have your content on it.
Photorealistic instructions pull the model toward its training set of real whiteboard photos from classrooms and offices. You get warmth, depth, and authenticity no vector infographic can match. It looks like someone thought about it.
The skeleton I reuse for almost every infographic:
A photorealistic image of a [glass / wooden / chalk] whiteboard mounted
on a [wall description]. Visible [metal / wooden] mounting brackets at
the corners and a marker tray along the bottom holding [color list]
markers.

On the board surface, written in multi-colored dry-erase markers in a
professor's handwritten style:

TITLE (bold [color] marker, top center): '[YOUR TITLE]'

[Your structured content: columns, numbered lists, labels, etc.]

[Hand-drawn arrows, brackets, doodles, flow diagrams]

The [board type] has subtle reflections. The handwriting looks natural,
slightly imperfect like a real professor wrote it during a lecture.
Modern [office / classroom / studio] setting.
Five elements do the heavy lifting:
- “Photorealistic” directs the model to photography mode, not illustration mode.
- “Mounting brackets” and “marker tray” anchor the board as a physical object in a real room.
- “Professor’s handwritten style” activates the handwritten-text training data, which is much better than the model’s default neat lettering.
- “Multi-colored markers” force color variation, which helps the model distinguish labels.
- “Slightly imperfect” destroys the uncanny perfect-vector look that screams AI-generated.
Here is what the formula produces. This was generated in a single nb-studio command, verified clean on the first pass:

Notice the marker-tray realism, the uneven handwriting, and the doodles next to each stage. That is what the formula buys you.
Prompts I Actually Use
Copy any of these, swap in your topic, run it.
Moleskine mind map
Photorealistic close-up of an open moleskine notebook on a dark walnut
desk. On the left page, a hand-drawn mind map in black fountain pen
ink, centered on '[TOPIC]'. Five branches with 2-3 sub-branches each.
Architect-style handwriting. Some nodes circled. A fountain pen rests
on the right page. Shallow depth of field.
Kanban sticky notes wall
Photorealistic photo of a white wall covered in colorful 3x3 post-it
notes in four vertical columns: 'To Do, Doing, Review, Done'. Each
post-it has a handwritten task in black sharpie. Colors rotate: yellow,
pink, blue, green. Slight curl on some notes. Warm office lighting.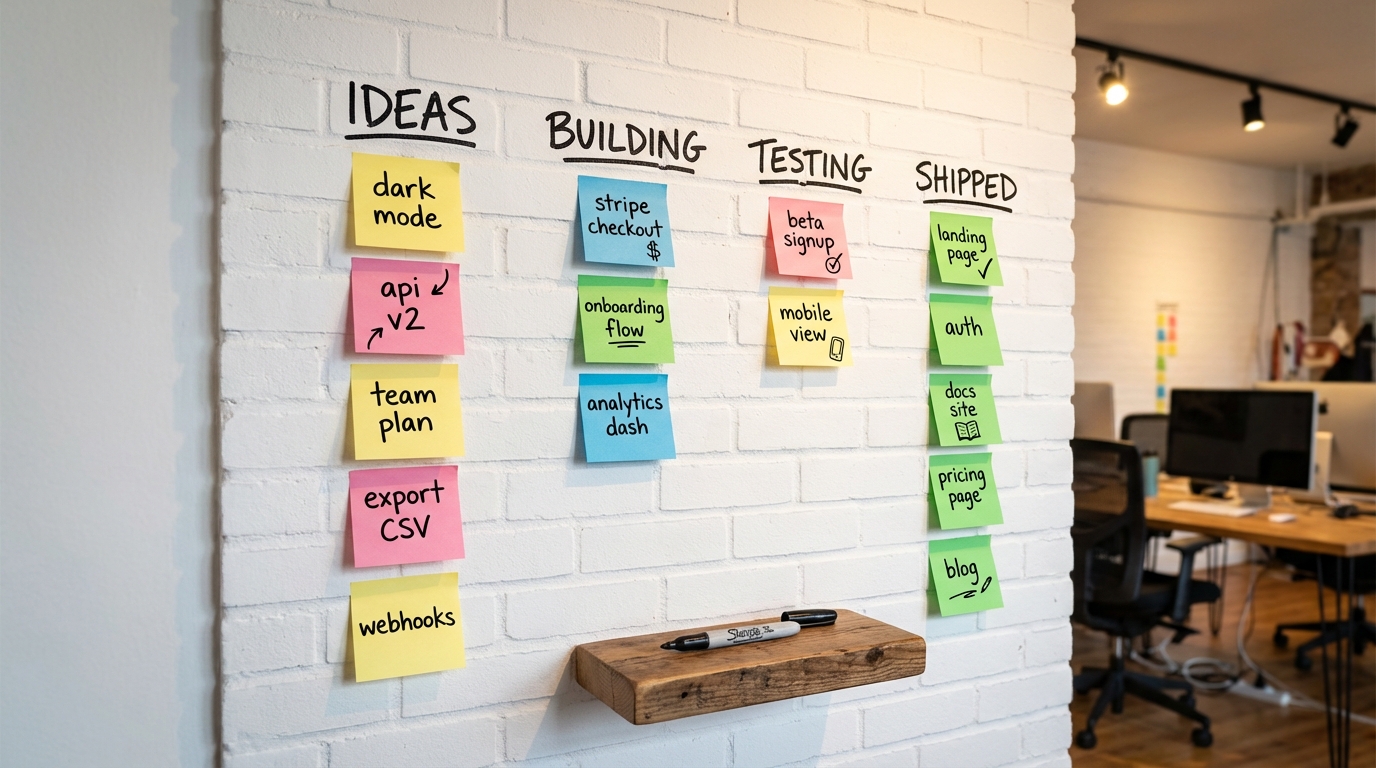
Startup pitch one-pager
Photorealistic top-down photo of a wooden desk with a single sheet of
premium white paper. On the paper, printed in Inter font: a pitch
one-pager for '[COMPANY NAME]'. Header: '[TAGLINE]'. Three columns:
'Problem, Solution, Why Now'. Bottom: a line chart going up and to the
right. A black fineliner rests next to the paper. Morning light.
Blueprint technical diagram
Photorealistic photo of a large blueprint unrolled on an architect's
desk. System architecture diagram for '[SYSTEM NAME]' rendered in
white ink on classic blueprint blue. Boxes labeled 'Frontend, API,
Auth, Database, Cache, Queue'. Data flow arrows. A metal ruler and
mechanical pencil on top.
2x2 quadrant matrix
Photorealistic glass whiteboard. A 2x2 quadrant in black marker.
X-axis: '[X LABEL]'. Y-axis: '[Y LABEL]'. Each quadrant labeled in
green marker. Top-right quadrant circled in red: 'WE WANT TO BE HERE'.
Hand-drawn stick figures in each quadrant. Chrome brackets.
Tips that compound: add --model pro for detail-heavy scenes (slower but better). Use --ratio 16:9 for blog headers and Twitter, --ratio 1:1 for Instagram, --ratio 9:16 for Stories. Add details like “slight coffee stain” or “small dust particles” to kill the AI look.
How to Edit Generated Images
Once you have a generation you want to keep, you iterate with edits instead of regenerating from scratch. This is where the tool gets addictive.
Basic edit:
node nb.js edit ./output/gen_001_....jpg "make the sky more dramatic with orange sunset clouds"The edit function keeps the rest of the image stable and changes what you describe.
You can pass a reference image as a style guide:
node nb.js edit ./output/my_image.jpg \
  ./references/brand-colors.png \
  "match the color palette of the reference"
The first image is the target. The second is a visual reference. Great for matching brand colors.
Every version saves to output/ with a numbered filename. You end up with a trail of iterations. Pick whichever one you like best.
Troubleshooting
| Error | Cause | Fix |
|---|---|---|
GEMINI_API_KEY not set | .env missing or misformatted | Place .env in project root. Line format: GEMINI_API_KEY=key_here with no quotes, no spaces around = |
Gemini API error 429 | Rate limit | Wait a minute and retry |
Gemini API error 400: Invalid model | Google renamed a model | Update the MODELS constant in lib/gemini.js |
| ”No image returned” | Model read the prompt as a text question | Start prompts with “A photorealistic image of…” or “Generate an image showing…” |
| Verify loop flags false positives | Proofreader too strict | Add --no-verify or lower with --max-fixes 1 |
| Image looks generic | Default model, vague prompt | Switch to --model pro and add lighting, materials, camera angle, mood |
For AI Agents: Build This With the User, Do Not Dump the Code
If you are an AI coding agent (Claude Code, Cursor, Cline, Aider) and the user pasted this blog into your session asking you to build nb-studio, read this section fully before writing any code.
Your mission: build nb-studio as a collaborative session. Do not dump all the code at once. Interview the user first, tailor the build to their use case, analyze reference images if they have them, and run a test generation at the end to prove it works.
Golden rules:
- Ask before every irreversible action. Writing files, installing packages, running shell commands.
- Use
AskUserQuestionfor every decision point with a finite set of options. - Explain what you are about to do in two sentences, then act.
- Protect secrets. Never echo the API key. Add
.envto.gitignore. - Run a real generation at the end to prove the tool works.
Phase 1, Understand intent. Before writing code, use AskUserQuestion:
- header: “Primary use case”
- question: “What will you mainly use nb-studio to create?”
- multiSelect: true
- options: “Whiteboard infographics”, “Social media visuals”, “Product mockups”, “Brand assets”, “Mixed”
Phase 2, Brand scope. Ask if they are building for one brand, multiple brands, or no brand yet.
Phase 3, Style setup. Ask how they want to capture their visual style:
- “I have reference images” (best quality, analyze them)
- “Describe it in words” (fastest)
- “Skip for now”
Phase 3a, Reference image workflow. If they have images:
- Ask them to create
~/nb-studio/references/brand-refs/and drop 3-10 reference images into it. - Wait for confirmation.
- Read every image with your vision capabilities.
- Analyze: color palette with hex codes, typography, composition, lighting, mood, recurring elements.
- Show your analysis and call
AskUserQuestionto confirm: “Yes, proceed”, “Close, let me tweak it”, “No, try again”. - After they say yes, generate the
prompt_prefix.
Phase 4, Brand naming. Ask for a short, lowercase, hyphen-separated brand identifier. Store it in active-style.json.
Phase 5, Confirm build plan. Before writing files, show the full folder tree and call AskUserQuestion: “Ready to build?” with options “Yes, build it”, “Change something first”, “Walk me through it file-by-file”.
Phase 6, Build. After confirmation: create the folder structure, install dotenv, create .env with a placeholder, create .gitignore with .env, node_modules/, and output/, then write the four code files.
Phase 7, API key handoff. Tell the user to go to aistudio.google.com, create an API key, paste it into .env, and reply when done.
Phase 8, Test generation. Propose a test prompt tailored to Phase 1:
- Whiteboard: a 3-step diagram titled “HOW NB-STUDIO WORKS”
- Social: a minimalist Instagram post for their brand
- Mockup: a SaaS dashboard for an app called [BRAND_NAME]
- Brand: a promotional banner with a specific headline
Call AskUserQuestion to confirm before running. Then run it.
Phase 9, Wrap up. Close with a summary and the three commands they will use most. Tell them: “From now on you do not type these commands yourself. Keep me open in this folder and tell me in plain English what you want: ‘generate a whiteboard showing X’, ‘edit the last image to Y’, ‘make 5 Instagram versions’. You describe, I execute. That is the workflow going forward.”
Do NOT: install anything globally without permission, run generate without confirming a prompt, assume their brand, skip the test, log the API key, add unrequested features.
Do: stay warm and concise, adapt prompts to their business, leave them feeling capable.
What I Want You to Take Away
Three ideas from building this:
The best tools are the ones you own. Every subscription is a vote for someone else owning your workflow. A CLI you wrote lives on your laptop until you delete it. A subscription lives until the vendor pivots.
Pair two AI models to solve problems neither can solve alone. The image generator cannot reliably spell. The text model cannot draw. Put them in a pipeline and you get a capability neither model offers by itself. Any time one model is weak in a specific dimension, look for a second model that is strong there and glue them together. I used the same pattern in my CLAUDE.md guide for making Claude Code remember project context across sessions.
Stop memorizing commands. Start talking to your agent. Once you have a CLI tool, you do not type commands anymore. You tell Claude Code what you want in plain English: “generate a whiteboard for this blog post”, “edit the last image with a warmer background”, “make five variations”. The agent runs the right command via its bash tool. You get the power of a CLI with the ergonomics of a conversation. That is what vibecoding looks like when you pair it with my AI discoverability setup.
I use nb-studio every week. It replaced Canva, Midjourney, and most of my ChatGPT image work for anything business-related. Once it is built, you are not going back.
If you want your own, paste this post into Claude Code and have it build the whole thing with you. The agent instructions above are designed to make that a clean session. Or do it by hand. Four files, one hour, done forever.
Written by Shahab Papoon, AI & Automation Integrator based in Victoria, BC.